Tips on using Flash in your Photography
Shooting with a flash indoors can be a somewhat frustrating task, even for some professionals. Although shooting inside can appear challenging at first, it’s far easier than, trying to create images on a summer day with a harsh high noon sun in the sky. If you can remember these tips you will be able to create great images inside every time.
#1 – GET AWAY FROM USING YOUR POP-UP FLASH
If you own a DSLR you never want to use the on camera flash/strobe. Why? Because using a pop-up flash will generally hurt your image instead of enhancing it. The power of a pop-up flash is limiting. Pop-up flashes tend to cause ‘Red Eye’ because the flash is too close to the lens. Additionally the light is unflattering; it creates flat light and yields sharp and harsh shadows.
#2 – USE AN ON CAMERA EXTERNAL FLASH
External Flashes/Strobes can be attached to the camera’s hot shoe. One thing to be aware of is not to aim it directly toward your subject. If you do, please refer above to “Pop-Up Flash” for the unappealing results. Try the alternative and turn it towards the ceiling or bounce it off a nearby wall to create directional light. You can even try bouncing it off the wall directly behind you. Remember high school physics? The angle of incidence equals the angle of reflection! If you point your flash directly at a mirror it will bounce back at you. If you aim the same flash at the mirror at a 45 degree angle it will reflect/bounce away from the mirror at 45 degrees in the opposite direction, hence no reflection back at the camera.
To create professional-looking portraits, you may want to refer to previous blog posts regarding lighting. You should also consider purchasing a light kit or an additional flash unit to use to provide you you more options. Flash units such as the Canon Speedlite 430EX III-RT or Nikon SB-700 Speedlite have accommodations so you can mount one flash unit on your camera acts as the master and the fill flash, and for a second unit to act as a remote flash (main light or background light).
#3 – LEARN THE TRIANGLE

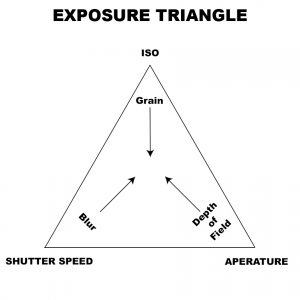
Fig. A
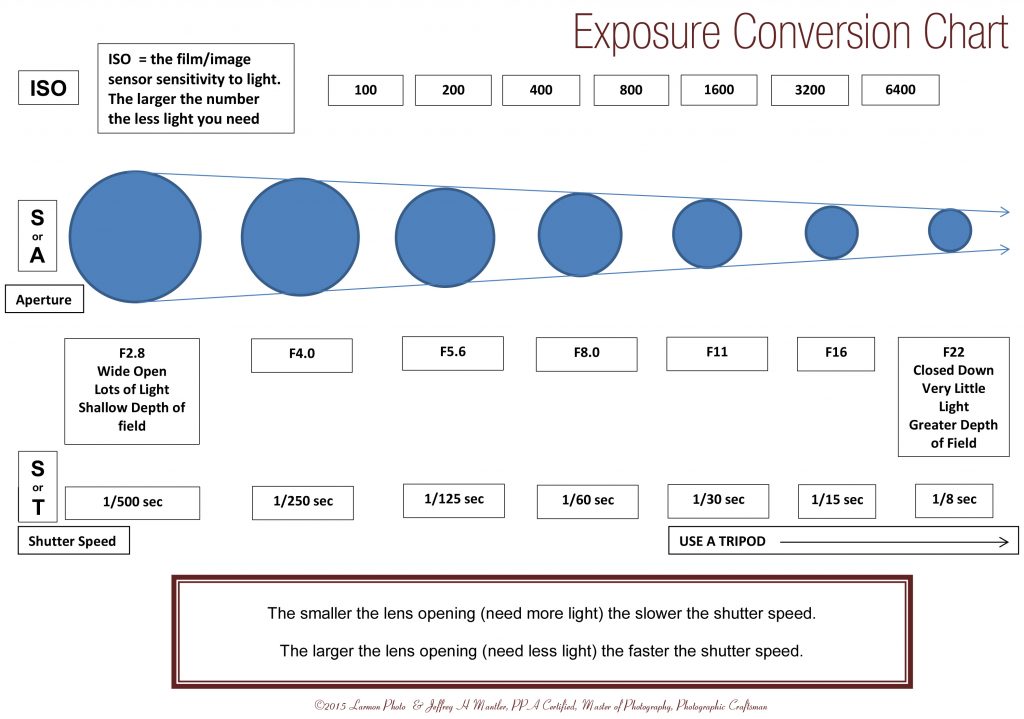
To maximize indoor photo opportunities without using any added light, master the Exposure Triangle (fig A) – Aperture, ISO and Shutter Speed. And refer to the Exposure Chart (fig B) below as a guide for controlling your depth of field. Remember that the chart is simple theory and can be used similar to a slide rule when making exposure corrections. Try using it along with your camera or a light meter, so you can get an idea of how it works from a practical standpoint.

Fig. B
Try experimenting by using the “fastest” lens you own (fast lenses have wider apertures (wide opening and smaller
numbers to allow a lot of light which in turn will require a faster shutter speed) like a 52mm f/1.2, open the aperture as wide as you can, set your shutter speed at a faster setting and remembering your ISO (sensor/film sensitivity) and see the difference it makes. Then make adjustments one f-stop setting at a time until the exposure, depth of field and sharpness are what you are looking for. Photography is algebra based, especially when converting exposures. All the exposures on the Exposure Chart are algebraically the same.
FIND A ‘HAPPY’ LOCATION
If there’s a particular location in your home, find the location that will always render the best results. It can be anyplace like your home such as your den, basement or maybe even your kitchen. It’s all about the quality of light! It doesn’t make a difference which room as long as the ambient light (unless creating window light portraits say in a Rembrandt style) is always bright and soft, and there are bright walls that will reflect and bounce the light around the room. This is one way you can be rest assured that this location will never let you down.
Don’t let the science of photography scare you! By learning the basics and understanding light you will be able to create great photographs no matter where you are. Remember to check our website at www.larmonu.larmonstudios.com for our schedule of classes, and if you are interested we also offer private one on one mentoring to sharpen your skills.

Comments
Tips on using Flash in your Photography — No Comments