New Online Ordering System at LarmonPhoto.com
Welcome to OPS, our Online Portal System. Larmon Photo is delighted to announce it has a new online user interface. The new interface allows you to easily order your photos online from your desktop/laptop and even your mobile devices.
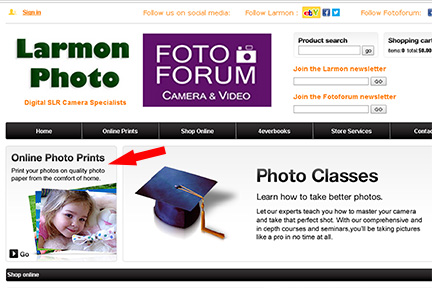
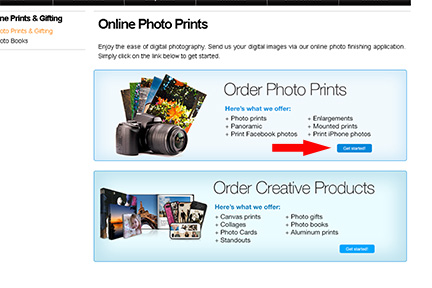
Let’s get started by visiting our website, www.larmonphoto.com. Click the Online Photo Prints icon as noted in example 1. The next step is to decide if you are going to order enlargements or order creative products such as photo books, aluminum prints, photo cards, canvas prints, collages and other photo gift items. Now click on the the appropriate icon as noted in example 2.
Uploading Your Image Files to OPS
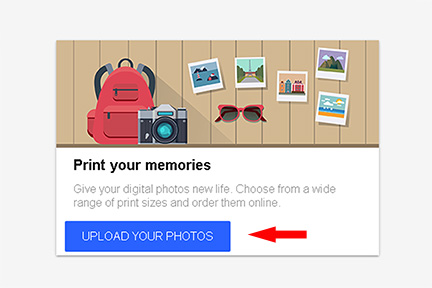
You are now ready to begin uploading your photos to our Online Portal System. Click on the “Upload Your Photos” icon as noted in example 3 and it will direct you to the “Choose your File” page, example 4; this screen, depending on the device you are using, will either direct you to select from your camera roll or other folders on your mobile device; you also have the option to drag and drop your files to the browser or click “Choose Files” to select your files in the more traditional methods such as searching My Computer, Facebook, Instagram, Flickr, and even your Google Drive and One Drive. When your files have been selected click “Upload”.
Once you locate your image files you can select multiple files by holding the CTRL key on your keyboard and right click on the images you want to upload to the Ordering Portal. You also have the option to drag and drop your photos into the Ordering Portal as demonstrated in Example 5. When you have selected all the image files you want to print you are ready to select the Upload button. Congratulations! your image file(s) have been uploaded to the Ordering Portal System.
Ordering Your Enlargements in OPS
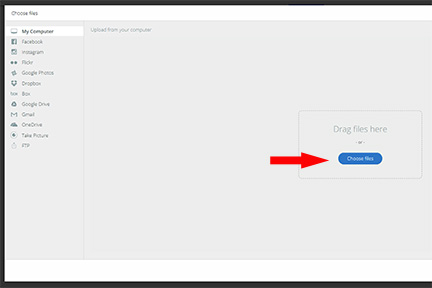
Example 4
You should now see your photos displayed in a Light Table format as shown in Example 6. Quickly review your photos to make sure you imported all the image files you intended. If you discover you missed one, simple click on the Add Photos button and repeat the uploading process shown in Example 5 until you have imported all of your image files.
Now let’s begin ordering some enlargements. We’ll start by double clicking to select a photo to order. As soon as you double click you will see the enlargement ordering screen, Example 7. Let’s
look around for a moment.
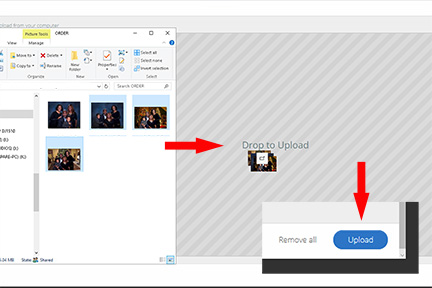
Example 5
The Ordering page defaults to the Sizes tab and to Standard size enlargements. You will notice four additional tabs, Square Prints so you can print your Instagram photos, Poster Prints which allows you to make enlargements as large as 24″x 48″, Panoramic Prints, and, Textiles which provides your ability to make photo blankets, pillows and totes. to add a print click the Plus sign next to the size you desire to print. As soon as you add a print you will see a blue
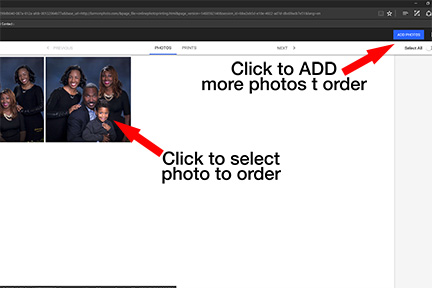
Example 6
marque appears over your image. There is a blue symbol in the lower right hand corner that you can use to crop you images. Left click on the icon and drag the box in towards center to make the box smaller or move it the left click button and pointing the cursor to the middle of the image re-left clicking and away from center to make it larger. You can then center the image by depressing the left click button, moving it over the box over the image until you are happy with how it looks and releasing. Beware if
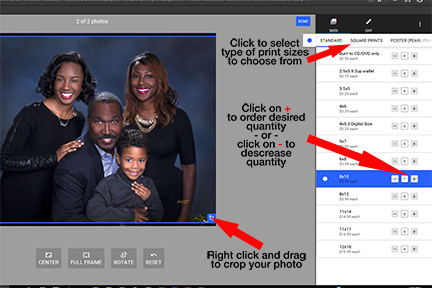
Example 7
you see a triangle warning icon, it means your file doesn’t have the pixel dimension to make the enlargement you desire to print. You can fix this by either try selecting a smaller size or you will need to get a higher resolution file that will accommodate the system. Use the + and – icons to increase or decrease the quantity of prints you desire.
Choose Your Options
Along the black tool bar you will also see an Edit tab. When click on the Edit tab you will see three functions. Click on Rotate, and see the controls appear under your image which allows you to rotate your image at 90
Example 8
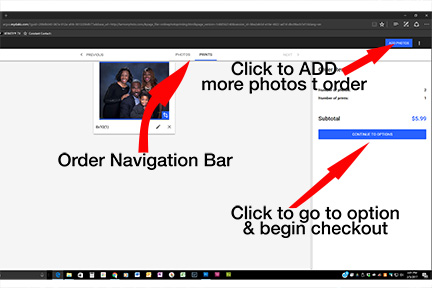
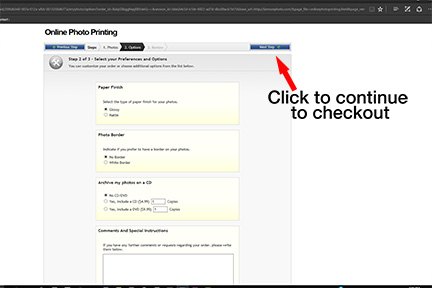
degree intervals both counter clockwise and clockwise. When you click on the Contrast button the features to adjust the contrast and brightness of you image appear under you photo and finally there are the Filters. When you select the filters you have the option to keep you images Original color, change it to Black & White or Sepia. Once you have completed ordering click done to move to the next screen. Finally, click next to review your order as seen in Example 8. You will see there is one more opportunity for you to add additional images to print, however, once you review your order you should click on the Continue To Options button. The options page, Example 9, is where you will select the type of paper you want your
Example 9
photos printed on, Glossy or Matte (semi-gloss). You can also indicate whether or not you wish to have your prints borderless or with a white border. Finally you can indicate if you would like to have your files burned to a CD or a DVD. There is also space for you to make notes or special requests. When finished click next to make one final review of your order.
Finalizing Your Order In Online Portal System
Example 10
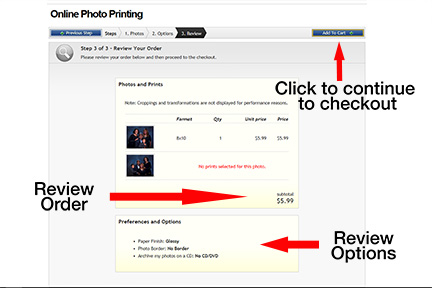
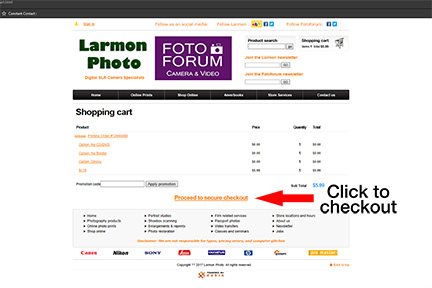
The Review screen, Example 10, provides you the opportunity to review your entire order. Here you can view thumbnails, sizes and quantities ordered, the options you have selected for your order and finally the price. If everything meets your approval click Add to Cart. Continue to checkout and to view your shopping cart, Example 11.
Your Shopping Cart provides one last opportunity to review your order before proceeding to a secure checkout. Before you finalize your order add any promo code you may have been issued.
Example 11
After you’ve reviewed your order click on the Proceed to Secure Checkout button to move to the Cashier Checkout screen, Example 12. If you are a local customer it is very important that you check Store Pick Up here. Now all you need to do is complete the form; click Continue and follow the instructions to complete the form and make your payment.
You will receive an email confirmation notifying you that your order has been placed. And finally, unless you have selected shipping, you will be notified via email that your order is complete and ready to pick up at the store.
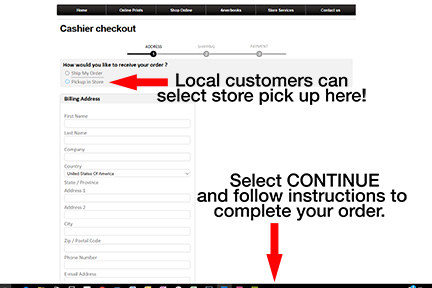
Example 12
Here are a few important facts to know about preparing your files for printing.
- .jpg format only
- Color Space is sRGB
- minimum 240 PPI
If you have any questions please do not hesitate to contact the store at (215) 887-1248 and speak with one of our lab experts to assist your.
Pixel Dimension Chart
The Pixel Dimension chart below outlines the optimal pixel dimension for image files. Most labs require 240 PPI as their default.
| PRINT SIZE | 240 PPI | 300 PPI | PRINT SIZE | 240 PPI | 300 PPI | |
| 3.5 x 5 | 840 x 1200 | 1050 x 1500 | 11 x 14 | 2640 x 3360 | 3300 x 4200 | |
| 4 x 4 | 960 X 960 | 1200 x 1200 | 11 x 17 | 2640 x 4080 | 3300 x 5100 | |
| 4 x 5 | 960 X 1200 | 1200 x 1500 | 11 x 22 | 2640 x 5280 | 3300 x 6600 | |
| 4 x 6 | 960 x 1440 | 1200 x 1800 | 11 x 28 | 2640 x 6720 | 3300 x 8400 | |
| 4 x 8 | 960 X 1920 | 1200 x 2400 | 12 x 12 | 2880 x 2880 | 3600 x 3600 | |
| 5 x 10 | 1200 x 2400 | 1500 x 3000 | 12 x 18 | 2880 x 4320 | 3600 x 5400 | |
| 5 x 15 | 1200 x 3600 | 1500 x 4500 | 12 x 24 | 2880 x 5760 | 3600 x 7200 | |
| 5 x 5 | 1200 x 1200 | 1500 x 1500 | 12 x 36 | 2880 x 8640 | 3600 x 10800 | |
| 5 x 7 | 1200 x 1680 | 1500 x 2100 | 15 x 30 | 3600 x 7200 | 4500 x 9000 | |
| 6 x 8 | 1440 x 1920 | 1800 x 2400 | 15 x 40 | 3600 x 9600 | 4500 x 12000 | |
| 6 x 9 | 1440 x 2160 | 1800 x 2700 | 16 x 16 | 3840 x 3840 | 4800 x 4800 | |
| 7 x 10 | 1680 x 2400 | 2100 x 3000 | 16 x 20 | 3840 x 4800 | 4800 x 6000 | |
| 8 x 10 | 1920 x 2400 | 2400 x 3000 | 16 x 24 | 3840 x 5760 | 4800 x 7200 | |
| 8 x 12 | 1920 x 2880 | 2400 x 3600 | 18 x 24 | 4320 x 5760 | 5400 x 7200 | |
| 8 x 16 | 1920 x 3840 | 2400 x 4800 | 20 x 20 | 4800 x 4800 | 6000 x 6000 | |
| 8 x 24 | 1920 x 5760 | 2400 x 7200 | 20 x 24 | 4800 x 5760 | 6000 x 7200 | |
| 8 x 8 | 1920 x 1920 | 2400 x 2400 | 20 x 30 | 4800 x 7200 | 6000 x 9000 | |
| 8.5 x 11 | 2040 x 2640 | 2550 x 3300 | 20 x 40 | 4800 x 9600 | 6000 x 12000 | |
| 9 x 12 | 2160 x 2880 | 2700 x 3600 | 22 x 28 | 4800 x 6720 | 6600 x 8400 | |
| 10 x 10 | 2400 x 2400 | 3000 x 3000 | 24 x 24 | 5760 x 5760 | 7200 x 7200 | |
| 10 x 13 | 2400 x 3120 | 3000 x 3900 | 24 x 30 | 5760 x 7200 | 7200 x 9000 | |
| 10 x 14 | 2400 x 3360 | 3000 x 4200 | 24 x 36 | 5760 x 8640 | 7200 x 10800 | |
| 10 x 15 | 2400 x 3600 | 3000 x 4500 | 30 x 30 | 7200 x 7200 | 9000 x 9000 | |
| 10 x 20 | 2400 x 4800 | 3000 x 6000 | 30 x 40 | 7200 x 9600 | 5400 x 7200 | |
| 10 x 30 | 2400 x 7200 | 3000 x 9000 | 30 x 45 | 7200 x 10800 | 9000 x 13500 | |
| 11 x 11 | 2640 x 2640 | 3300 x 3300 | 32 x 36 | 7680 x 8640 | 9000 x 13500 |

Comments
New Online Ordering System at LarmonPhoto.com — No Comments